Year: 2017

31 Jul

How to render button in Django base table?

Assume that you have a table as defined below

class CustomerTable(BaseTable):
    pk = ToggleColumn()
    name = tables.LinkColumn('customers:customer', args=[Accessor('customer.id')])


    class Meta(BaseTable.Meta):
        model = Customer
        fields = ('pk', 'name',  'city', 'state' , 'phone')

Now assume you would like to display a button next to the phone

we can do it as below

class CustomerTable(BaseTable):
    pk = ToggleColumn()
    name = tables.LinkColumn('customers:customer', args=[Accessor('customer.id')])
    edit_button = tables.Column(empty_values=())

    
    class Meta(BaseTable.Meta):
        model = Customer
        fields = ('pk', 'name',  'city', 'state' , 'phone', 'edit_button')

    def render_edit_button(self, record):
        rendered_item = format_html(
            "<a href='{url}' class='btn btn-primary' role='button'>Edit</a>",
            url= reverse('users:user_edit', kwargs={'id':record.id})
        )
        return rendered_item
19 Jul

Useful Linux Tips

#Replace all occurrence of City with Town in every txt file within the current directory.
$sed -i 's/City/Town/g' *.txt

Using vim editor, replace foo with bar from line 23 to 30
:23,30s/foo/bar/g

19 Jul

Useful git commands

#remove files only from local, not from git
$git rm -r --cached myfolder/

#reset back to the head
$git reset --hard my_branch

#make a branch same as master
$git checkout -B new master

#Delete local branch
$git branch -d branch_name

#delete a remote branch
git push origin --delete branch_name

#push a new local branch to remote
$git push -u origin my_branch

#ignore file mode change
$git config core.fileMode false

#Fetch a remote branch
$git fetch
$git checkout new_branch

19 Jul

Useful PostgreSQL Queries and Commands

Connecting as root
$sudo -u postgres psql

Connect to database server:
$psql --username=myusername --host=localhost --password

Select a database with name mydatabase:
myusername=>\c mydatabase;

List all tables:
myusername=>\dt;

Get table structure:
myusername=>\d+ my_table;

Take a dump
$pg_dump --username=myusername --host=localhost --password mydatabase > db.sql

Import a database
$psql --username=myusername --host=localhost --password mydatabase < db.sql

5 Jul

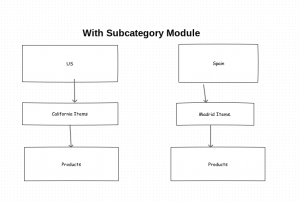
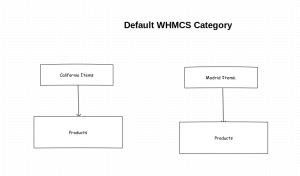
Multi Level Product Category (Product Subcategory) in WHMCS

By default in WHMCS, only one level product categories are possible. Assume that you have a category
US and another Category Spain. And under US you have another category California Items
and Under Spain you have another category named Madrid Items.

Then currently you have to create two categories named California Items and Madrid Items as two categories. Then you can add products under California Items and Madrid Items. But there is no way to add subcategory in WHMCS. We developed a module, which allow to add a parent category and then number of child category to it.Anybody looking for such a module, please contact.


6 Jun

Hostbill plugin development

1)Create a folder with plugin name.
If plugin name is example, create a folder with name ‘example’.

2)Create a file named
class.example.php. Also a folder named admin in it.

3)In the admin folder create a file named
class.example_controller.php
also can create tpl files here.

Let’s create a tpl named default.tpl here.

4)Let’s create client side basic code in the file class.example.php.


<?php

class example extends OtherModule {

protected $modname = 'Example';
protected $description = 'Sampple Plugin';
protected $version = '0.1';

protected $info = array(
        'haveadmin'    => true,  // is module accessible from adminarea
        'haveuser'     => false, // is module accessible from client area
        'havelang'     => false, // does module support multilanguage
        'havetpl'      => false, // does module have template
        'havecron'     => false, // does module support cron calls
        'haveapi'      => false, // is module accessible via api
        'needauth'     => false, // does module needs authorisation
        'isobserver'   => false, // is module an observer
        'clients_menu' => false, // listing in adminarea->clients menu
        'support_menu' => false, // listing in adminarea->support menu
        'payment_menu' => false, // listing in adminarea->payments menu
        'orders_menu'  => false, // listing in adminarea->orders menu
        'extras_menu'  => true, // listing in extras menu
        'mainpage'     => true, // listing in admin/client home
        'header_js'    => false, // does module have getHeaderJS function
    );

protected $configuration=array(
         'Field1' => array(
            'value' => '',
            'type' => 'input',
            'description' => 'My description'
        ),
        'Field2' => array(
            'value' => '',
            'type' => 'input',
            'description' => 'My description'
        ),
        'Field3' => array(
            'value' => '0',
            'type' => 'check',
            'description' => 'My description'
        )
    );

public function install() {
  echo "Install";
  return true;
}

}

5)

<?php


class example_controller extends HBController {
    /*
	?cmd=example
    */


    function _default($request) {
	//default function, just like our default index.php
        $showheaderandfooter = true;
        $module_type = 'Other';
        $this->template->assign('test', 'test');
        $this->template->render(
                APPDIR_MODULES .
                $module_type . '/example/admin/default.tpl', [], $showheaderandfooter
        );

    }

    /*
	?cmd=example&action=testfunction
    */

    function testfunction($param) {
	//action=testfunction, even for post action we can do like this
        $showheaderandfooter = true;
        $module_type = 'Other';
        $this->template->assign('test', 'test');
        $this->template->render(
                APPDIR_MODULES .
                $module_type . '/example/admin/testfunction.tpl', [], $showheaderandfooter
        );
    }


}

6)The content added to the file admin/default.tpl is
{$test}

16 May

CyberSource Payment Gateway Module for WHMCS

We have to use Cybersource’s SOAP Toolkit for the WHMCS payment gateway module.Using the toolkit we can develop a Merchant Gateway as explained in the link https://developers.whmcs.com/payment-gateways/merchant-gateway/

The SOAP toolkit details can be found in the URL https://www.cybersource.com/developers/getting_started/integration_methods/soap_toolkit_api. Also read the PDF http://apps.cybersource.com/library/documentation/dev_guides/SOAP_Toolkits/SOAP_toolkits.pdf

We are not covering basics of Payment gateway module development for WHMCS in this post. But we are explaining basics of Cybersource’s API here. Sample code with PHP can be downloaded from the URL www.cybersource.com/support_center/implementation/downloads/soap_api/sample_files/sample_php.zip

It’s better to store subscription id, returning from the cybersource and use that for recurring payments.In this way we can avoid repeated entry of credit card details. From the _storeremote($params) function of your WHMCS payment gateway code, we can create the subscription_id. Below briefly explaining code to produce the subscription id.

function cybersourcegateway_storeremote($params) {
    require_once("cybersource_lib/vendor/autoload.php");
    $referenceCode = '<order number>';
    $options = array();
    
    $client = new CybsSoapClient($options, $params);
    $request = $client->createRequest($referenceCode);
    
    $ccAuthService = new stdClass();
    $ccAuthService->run = 'true';
    $request->ccAuthService = $ccAuthService;

    $billTo = new stdClass();
    $billTo->firstName = "<First name here>";
    $billTo->lastName = "<Last name here>";
    $billTo->street1 = "
<address here>";
    $billTo->city = "<city here>";
    $billTo->state = "<State here>";
    $billTo->postalCode = "<Post code here>";
    $billTo->country = "<Country here>";
    $billTo->email = "<Email here>";
    $billTo->ipAddress = "<Ip address here>";
    $request->billTo = $billTo;
 
    
    $card = new stdClass();
    $card->accountNumber = "<card number here>";

    $card->expirationMonth = "<expiry month here>";
    $card->expirationYear = "<expiry year here>";
    $card->cardType = "<card type here>";
    $request->card = $card;

    $purchaseTotals = new stdClass();
    $purchaseTotals->currency = $params['currency'];
    $purchaseTotals->grandTotalAmount = $params['amount'];
    $request->purchaseTotals = $purchaseTotals;

    $recurringSubscriptionInfo = new stdClass();
    $recurringSubscriptionInfo->frequency = "on-demand";
    $request->recurringSubscriptionInfo = $recurringSubscriptionInfo;

    $paySubscriptionCreateService = new stdClass();
    $paySubscriptionCreateService->run = 'true';
    $request->paySubscriptionCreateService = $paySubscriptionCreateService;

    $reply = $client->runTransaction($request);
    $subscription_id = $reply->paySubscriptionCreateReply->subscriptionID;


 if ($reply->decision == 'ACCEPT' && $reply->reasonCode == '100') {
    return array(
        "status" => "success",
        "gatewayid" => $subscription_id,
        "rawdata" => json_encode($reply)
    );
 }
else {
        return array(
            "status" => "failed",
            "gatewayid" => $subscription_id,
            "rawdata" => json_encode($reply)
        );
    }
}

Then in your capture function, call API as given below.

function cybersourcegateway_capture($params) {
   require_once("cybersource_lib/vendor/autoload.php");
    $referenceCode = $params['referencecode'];
    $options = array();
    $client = new CybsSoapClient($options, $params);

    $request = $client->createRequest($referenceCode);
    $ccAuthService = new stdClass();
    $ccAuthService->run = 'true';
    $request->ccAuthService = $ccAuthService;

    $ccCaptureService = new stdClass();
    $ccCaptureService->run = 'true';
    $request->ccCaptureService = $ccCaptureService;

    $purchaseTotals = new stdClass();
    $purchaseTotals->currency = $params['currency'];
    $purchaseTotals->grandTotalAmount = $params['amount'];
    $request->purchaseTotals = $purchaseTotals;


    $recurringSubscriptionInfo = new stdClass();
    $recurringSubscriptionInfo->subscriptionID = $params['gatewayid'];
    $request->recurringSubscriptionInfo = $recurringSubscriptionInfo;


    $reply2 = $client->runTransaction($request);

    if ($reply2->decision == 'ACCEPT' && $reply2->reasonCode == '100') {
        return array(
            "status" => "success",
            "transid" => $reply2->requestID,
            "rawdata" => json_encode($reply2)
        );
    } else {
        return array(
            "status" => "failed",
            "transid" => $reply2->requestID,
            "rawdata" => json_encode($reply2)
        );
    }
}

Those who would like to hear more about the gateway development, post a comment. Will reply asap.

And those who are looking for a ready made module, please contact us from the link Request a quote. We will get back to you asap.

11 Apr

Domain verification using Let’s Encrypt DNS Challenge Type (dns-01)

From the link https://github.com/analogic/lescript, we will get a nice script to create SSL Certificates. The script has code to verify domain after uploading a file to a folder .well-known/acme-challenge in the document root. If the domain is not yet hosted , we have to verify the domain using DNS TXT record.

This post explains about domain verification using DNS method.

First of all download the script from the link https://github.com/analogic/lescript.
Then we can use most of it’s code for domain verification using DNS too.

We have to use response we get for

$response = $this->signedRequest(
                    "/acme/new-authz", array("resource" => "new-authz",
                "identifier" => array("type" => "dns", "value" => $domain)
                    )
);

This array will have challenge details for domain verification using http, dns etc.

To get dns challenge details, use the below code

$dns_challenge = array_reduce($response['challenges'], function ($v, $w) use (&$self) {
                return $v ? $v : ($w['type'] == "dns-01" ? $w : false);
            });

From the dns challenge we can collect token and key authorization.

$dns_token = $dns_challenge['token'];

$dns_payload = $dns_token . '.' 
                    . Base64UrlSafeEncoder::encode(hash('sha256', json_encode($header), true));

You can see that token and key authorization are creating just like we create for http-01. Now the main difference is, how we calculate the DNS TXT Record.

For domain verification using http-01, we create a file named
http://${domain}/.well-known/acme-challenge/${challenge[‘token’]}
and we put the payload as content of the file.

But for dns-01 domain verification, we are not adding TXT value as payload, but we calculate a string by below code.

// name of the domain
$name = '_acme-challenge'. $domain;

//points to
$dns_txt_record = Base64UrlSafeEncoder::encode(hash('sha256',$dns_payload, true));

Then we have to add $name and $dns_txt_record to the dns zone TXT record.
We can check weather the value is added correctly or not by typing below command in terminal.

dig txt _acme-challenge.[domain]

Then we can invoke the domain verification using dns-01 type.

$result = $this->signedRequest_dns(
                $challenge_uri, array(
            "resource" => "challenge",
            "type" => "dns-01",
            "keyAuthorization" => $dns_payload,
            "token" => $dns_token
                )
        );

If anybody need more explanation or help, please do post comments.
Will answer asap.
3 Apr

WHMCS Addon Module Development Using Smarty

Main aim of this post is not to discuss all steps of WHMCS addon module development. We are discussing two points that are not well explained in many blogs.

1)How to create and delete tables using new WHMCS database component. As full_query is deprecated, we have to use Illuminate Database. This post explains how to do table creation and deletion using WHMCS Illuminate Database.

2)When creating WHMCS addon without using Smarty, We are making html code complicated with mix of single and double quotes. So in this post we are discussing how to write HTML content using Smarty.

Assume that we have to develop an addon with name ‘example’. Steps to create the addon module is explained below.

1)create a folder named `example`.
In the folder create two files.

a)example.php
b)hooks.php
Also create folders named `lang` and `templates`

2)Now let’s open the file example.php and add the below code.

  <?php

if (!defined("WHMCS"))
    die("This file cannot be accessed directly");

use Illuminate\Database\Capsule\Manager as Capsule;

   function example_config() {
    $configarray = array(
        "name" => "Sample Addon",
        "description" => "Sample Addon is just an addon to explain you",
        "version" => "1.0",
        "author" => "WHMCSTools",
        "language" => "english",
    );

    return $configarray;
}


//Table is creating here
function example_activate() {
   if (!Capsule::schema()->hasTable('sample_table')) {
        Capsule::schema()->create('sample_table', function($table) {
            $table->increments('table_id');
            $table->integer('age');
            $table->string('name', 100);
            $table->date('created_at');
            $table->float('amount', 8, 2);
            $table->text('description');
        });
    }

    return array('status' => 'success', 'description' => 'Module activated');
}
function example_deactivate() {

    Capsule::schema()->dropIfExists('sample_table');
    return array('status' => 'success', 'description' => 'Module deactivated');

}

function example_output($vars) {
}

function example_clientarea($vars) {
}

3)Now we can write what we have to display in admin side of the module
in the function example_output() {.

For example we can define the function as

function example_output($vars) {
   echo '<p>The date & time are currently ' . date("Y-m-d H:i:s") . '</p>';
}

But if we have much more HTML content to display, we have to create a big string and then echo it. Better way to display the HTML content is using a Smarty file.

For that let’s create a file named time.tpl in the folder templates.
Let’s discuss the template usage with the same simple content. But we can extend that for complex contents too.

Content of the tpl file is

 <p>The date & time are currently {$date}</p>

Now let’s discuss how to use the tpl from the example_output function.

 function example_output($vars) {
   $smarty = new Smarty();
   $smarty->assign('date', date("Y-m-d H:i:s") );
   $smarty->caching = false;
   $smarty->compile_dir = $GLOBALS['templates_compiledir'];
   $smarty->display(dirname(__FILE__) . '/templates/time.tpl');
 }
20 Mar

WHMCS Hooks Priority

WHMCS Hooks are a nice way to write custom code.

We can add hook functions to a php file (File name can be anything, let’s assume our file name as test.php) and it should be uploaded to the folder /includes/hooks.

All WHMCS hooks are listed in the page https://developers.whmcs.com/hooks/hook-index/.

Now let’s explain WHMCS hooks priority. We can add custom code to be executed on every WHMCS client area page to the below hook.

<?php
add_hook('ClientAreaPage', 1, function($vars) { 
    // 1 is the priority value
    echo "From priority value 1<br>";
});

In the above hook code, we added code to be executed on the client area page as

 echo "From priority value 1<br>";

We can add same hook functions many times.
Let’s add another ClientAreaPage hook as shown below.

add_hook('ClientAreaPage', 2, function($vars) { 
     //2 is the priority value
     echo "From priority value 2<br>";
});

So the first ClientAreaPage hook has priority 1, second hook as priority 2.
So we will get the below out put.


From priority value 1
From priority value 2

Hook with priority value 1 is executed first,then hook with priority value 2 is executed.